How are Images managed in the Shopify / Infusion Sync?
Product Image Settings
Before you load any images to sync to your Shopify website, ensure that you turn ON the product setting Include new documents/images in website by default.
Images on standard products
Products with their images are fully sync'ed from Infusion to Shopify. That means any changes you make in Infusion will over-write any changes you have made to Inventory in Shopify. This includes Product Images. Infusion is the source of truth for the product including its images.
Variant Images in Shopify
Multiple images on Product Variants should be checked carefully to ensure they are visible on the website as desired.
What data is used in Shopify Collections?
The Infusion integration with Shopify only maps the Infusion Product Group and Subgroup to Collections in Shopify. Products can be synced with these two Collections / Categories.
How do I setup Shopify to work with Infusion correctly?
Shopify has introduced limitations on Admin API access tokens at the store level, and legacy custom apps are being deprecated — no new legacy apps can be created after January 1, 2026.
Disclaimer: Please note Shopify has recently made changes to how Admin API access tokens and custom apps are managed. This article is based on our best knowledge.
You will need an active Shopify account for setting up Shopify with Infusion.
Shopify is set up with Infusion using a GraphQL Admin API which requires a valid Shopify Access token.
Log in to Shopify using the account details you wish to connect with Infusion. You should be redirected to the store that has already been created or if you have multiple stores under your Shopify account, select the stores that you wish to set up with Infusion
If no stores have been created or if you want to test the Shopify to Infusion integration, follow the steps to create a store.
Note: Currently the users can only connect one Shopify Store to Infusion
Create a store in Shopify
Log in to Shopify using your account credentials, then from the home page, select the purpose of the store, enter the preferred store name, build version, and data configuration values as prompted and ‘create development store’.

If you are creating a store for testing purpose, we recommend you select the following:
- Purpose of the store - Create a store to test and build
- Build version - Current release
- Data Configurations - Start with an empty store
Note: If you are creating a test store for integration testing with Infusion, you must unlink the test store prior to configuring Infusion with the original store
To integrate Shopify with Infusion, the user must first generate a valid Shopify access token
Follow the below steps for generating a Shopify Access token
1. Set up a Shopify App for generating a Shopify access token
Before you can use the GraphQL Admin API, you need to create a Shopify app and obtain API credentials.
Log in to Shopify and Create a new Shopify App, if you have multiple stores created select the store that you wish to set up with Infusion and follow the below steps
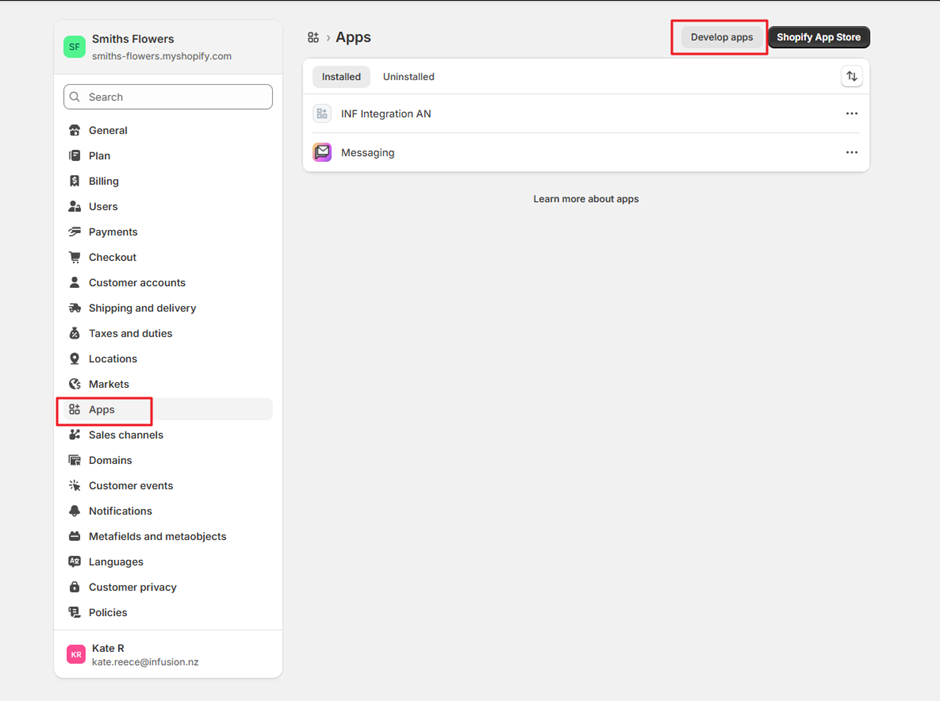
1.1 From the Home page, go to the 'Settings' menu, then select the 'Develop Apps' option under the 'Apps' tab.

Select ‘Build apps in Dev Dashboard’ option.
Once confirmed, you will be taken to the App development page from where the Shopify app is created and configured.

2. Creating and configuring the Shopify app on the selected store
2.1 Create an app
Select Create an app option and you’ll be prompted to provide the following details:
App Name: This will be the unique name of the app within your store.
After entering the required information, click the ‘Create App’ button.


Once the app is successfully created, you can view the app details under the 'Apps' tab.
2.2 Configure App Version and Scopes
Uncheck "Embed app in Shopify admin" — this is checked by default and must be unchecked for this flow to work correctly.

Under the Access section, click Select scopes next to the Scopes field and select all required Admin API scopes for your integration.
See the page below for the scopes that need to be selected
https://infusion.helpjuice.com/en_AU/shopify-scopes
Copy the selected scopes into Notepad as you will need them later, then enter them as a comma-separated list in the scopes field.


Click ‘Done’ after selecting the scopes
2.3 Enable Legacy Install Flow
Set the Use legacy install flow to true. This step is important— without enabling the legacy install flow, the offline token generation process will not work.
2.4 Set Redirect URL
In the Redirect URLs field, enter https://localhost/ as the redirect URL.
2.5 Release the App Version
Once all the above settings are configured, click Release at the bottom of the page. This makes the app version active and ready to be installed on your store.

2.6 Copy Client Credentials
Navigate to Settings in the left sidebar and copy both the Client ID and Client Secret.

3. Construct the Authorization URL
Build the authorization URL using the template below, replacing each placeholder with your actual values. {SHOP_NAME} is your Shopify store name, {CLIENT_ID} is from the Developer Dashboard, and {SCOPES} is the comma-separated list of scopes copied in Step 3.
https://{SHOP_NAME}.myshopify.com/admin/oauth/authorize?client_id={CLIENT_ID}&scope={SCOPES}&redirect_uri=https://localhost/4. Install the App and Capture the Authorization Code
Open the constructed URL in a browser and click ‘Install’.

You will be redirected to a broken localhost page — this is expected behaviour. In the browser address bar, locate and copy the value that appears after code=. Note that the authorisation code expires in 60 seconds, so if the page does not load immediately, press Enter once and then copy the full URL straight away to extract the code parameter.

5. Exchange the Code for an Offline Access Token
Make a POST request to https://{SHOP_NAME}.myshopify.com/admin/oauth/access_token with the header Content-Type: application/json and the following JSON body. The response will contain your offline Admin API access token, which does not expire and can be used immediately for integrations.
{
  "client_id": "YOUR_CLIENT_ID",
  "client_secret": "YOUR_CLIENT_SECRET",
  "code": "CODE_FROM_BROWSER"
}Before setting up Shopify on infusion, please update the following settings on Shopify:
- Time Zone – Time Zone can be updated from the general tab under settings menu (this needs to update to match the store region as orders will be created for the store according to the time selected)

2. Shipping rates for the region - Shipping rates can be updated from the 'Shipping and Delivery' tab in the Settings menu

3. Tax rates – In Shopify you can activate the setting for dynamic tax inclusion or exclusion, based on your customer's location, similarly, The GST settings on Infusion can be GST inclusive or GST Exclusive
Note: The tax setting on Shopify should match with the GST setting on Infusion
3.1 If the GST setting in Infusion is GST exclusive, follow these steps in Shopify:
3.1.1 Go to Settings, then navigate to Taxes and Duties, select ‘New Zealand’ from the Regional Settings options. Under the GST collection section, choose 'Collect in new region.
Enter the GST number if known, if not click collect GST.

GST will be set at 15% by default for New Zealand.
3.1.2 Update the Market and Tax display settings
From the settings menu Select New Zealand as Market

Select ‘Show as line item’ for Tax display value under duties and Import tax setting

3.2 If GST setting on Infusion is GST inclusive, follow these steps in Shopify
Follow all steps as per section 3.1and for the tax display settings please select ‘Show as included’

Additionally, you will also have to enable ‘Include sales tax in product price and shipping rate’ option under the Global settings.

Follow the steps below on Infusion to set up Shopify
- Log in to Infusion and go to the E-commerce settings. From there, select Shopify as your e-commerce provider by following this path: Settings → Integrations → E-commerce Settings → Select Shopify as the e-commerce provider

Link the created store to Infusion by providing the Shopify site URL and the Access token

Enter the requested information in each of the fields. These will be used when sales made on the Shopify Store are posted through into Infusion.
- E- commerce Provider: Choose your E-Commerce provider, Shopify.
- Shopify URL: This is the URL of the Shopify store.
- Shopify access token: This is the Access token from Shopify Admin API
- B2C Customer Workflow: Set to use Cash Sales Account by default
- Guest Checkout Customer Workflow: Set to use Cash Sales Account by default
- Cash Sales Account: This is the account that the previous option will assign either unmatched email sales or all sales to
- Sales Rep Hierarchy: Select the sales rep hierarchy to use for the Shopify sales
- Default Sales Rep: Assign a default sales rep to Shopify
- Product location: If multiple locations are used to store products, which location are products being sold from.
- Allow Out of Stock Ordering: This determines whether products that are currently out of stock can be sold in Shopify.
- Website Price level: Select the Price level being used for products on Shopify
- Batch Fetch Limit: Set by default
- Batch Update Limit: Set by default
- Connection Timeout (Seconds): Set by default
2. Once the details are saved click ‘Test Settings’ option and the testing should be successful.

3. Confirm that the GST settings in Infusion match those in Shopify by navigating to: Settings → GST Settings. Then, check 'GST on quotes/invoices' is matching with the Shopify set up.


