The Pick and Pack module allows users, typically warehouse staff, to barcode scan the items ordered by a Customer, check them off to confirm the correct goods are being supplied, amend the order if required and confirm / finalise the picking process. Currently only invoices that dont include serial number tracked items can be pick and packed.
Settings
To enable Pick & Pack, go to Settings > Customers> Customer Invoice & Quote Settings and set the Invoice Picking And Dispatch Tracking to “Full Picking/Packing & Dispatch”.

Required Role
A user must have the new roles “Warehouse Manager” and “Warehouse Staff” enabled. Go to Settings > Users and select these two options.
When selected, the user will have a new menu item “Pick and Pack”.
Creating an Invoice to be Picked & Packed
An unposted customer invoice that is not On Hold will be available for picking and packing. This invoice must be created after the setting is turned on.
Starting a Pick & Pack
When a Pick & Pack is in progress, the invoice is unable to be edited by any other users.
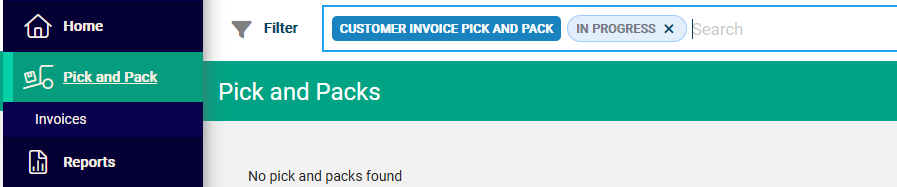
From the Pick & Pack menu, select “Invoices”.
This list is limited to invoices with a status of:
- Not Yet Picked; and
- Not on Hold; and
- Unposted
Select the Pick & Pack tab at the right end of an invoice row to start the process.

This will open the invoice / order ready for data entry by using a barcode scanner.
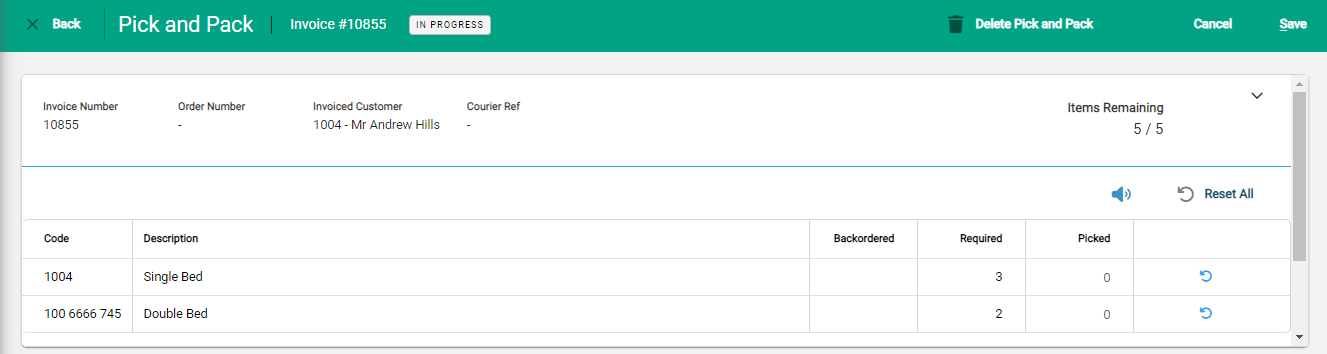
As the user scans the barcode of the physical item, the Picked quantity increases.
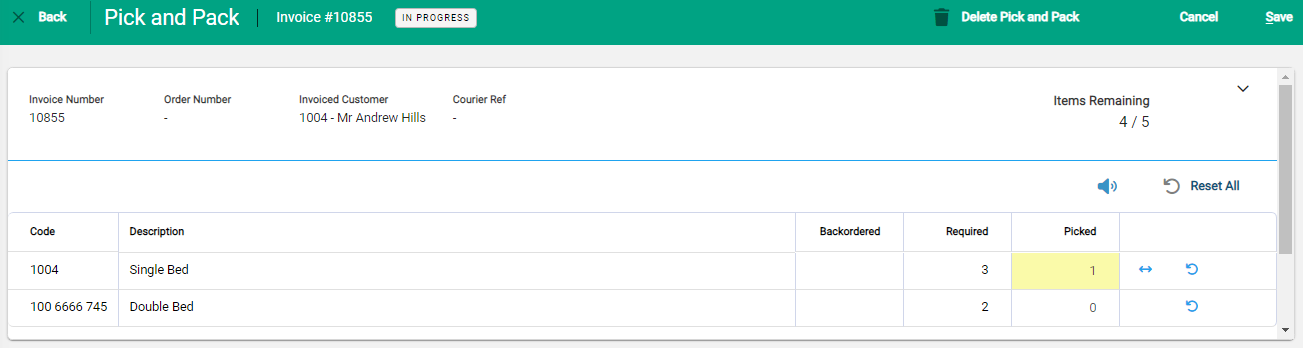
The user hears a beep each time a correct product is picked.
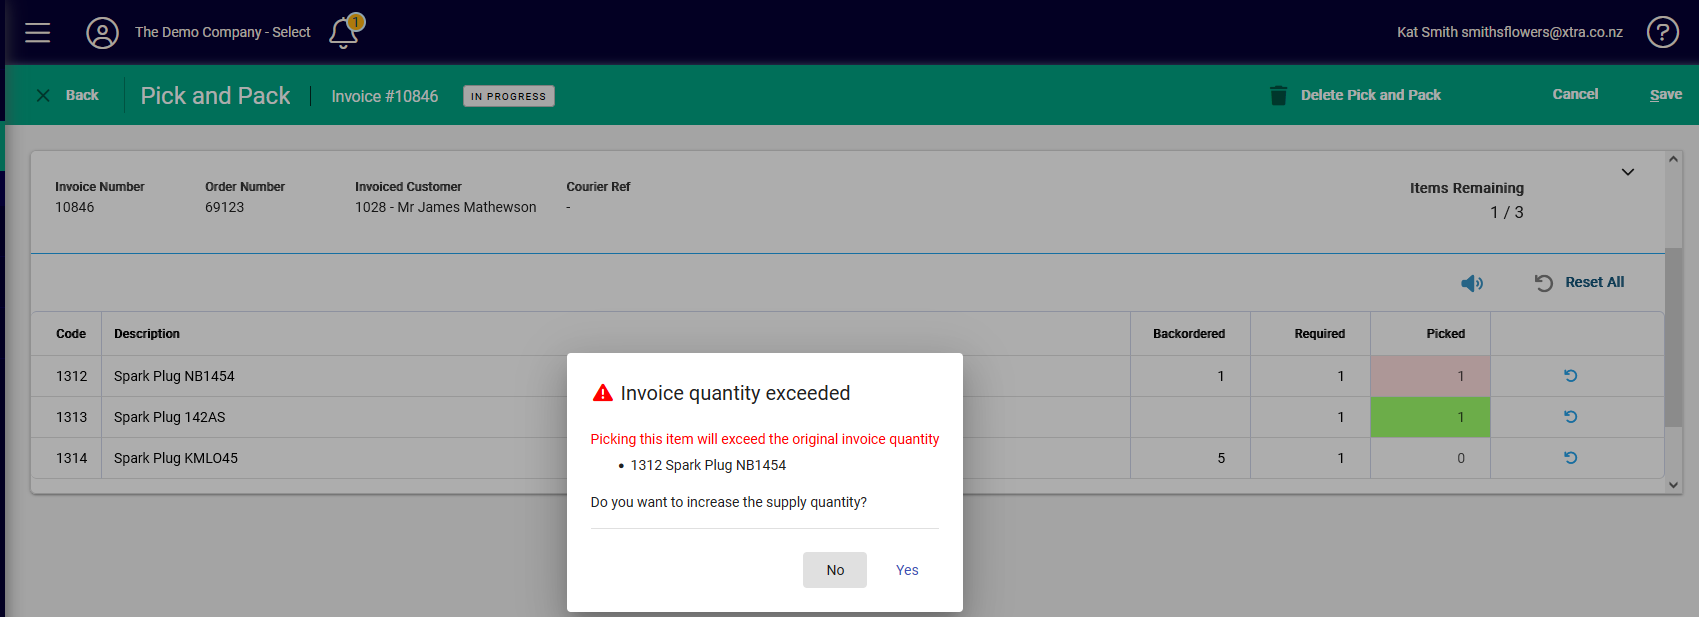
Over-picking an item
If a scanned item results in over-picking a product on the invoice, the user hears an error beep and a popup prevents any further scanning. The user can choose to increase the supplied quantity or to put the item aside. In this case, the user decides to increase the supply which will reduce the backordered quantity of product 1312 by 1.
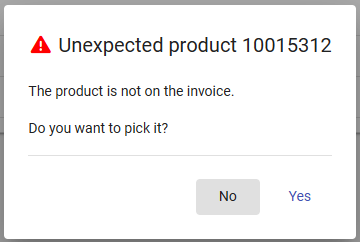
Scanning an item that is not on the invoice
If an incorrect product is picked, the user hears an error beep indicating that this product is not currently on the invoice. They can then decide whether to add the product to the invoice or not.
Autofill
The Autofill icon (↔) is available on a Pick & Pack line when:
- The product has no barcode; or
- The product has a barcode and at least one item has been scanned. This means the correct product has been scanned but avoids situations where there may be a large quantity on the invoice and avoids the user needing to scan a single product many times. eg: required quantity is 72 which is 3 boxes of 24. The user scans 1 item and then auto fills the line to avoid scanning 72 times.
Reset
A user can reset a pick & pack line or reset all pick & pack quantities when in edit mode using the  icons.
Successful Pick and Pack
When all lines on the pick and pack have been completed, there will be another short, higher pitched beep and the “Items Remaining” box will appear green with a balance of 0.
Saving the Pick & Pack
After scanning is complete, or at a pause in scanning, the user can save the Pick & Pack. This saves the current status so the Pick & Pack can be returned to later by the current or a different user. Once Saved the Pick and Pack needs to be Edited (from the top menu bar) to make the screen active for further scanning
Printing Packing Slips / Delivery Labels
To print Packing Slips and / or Delivery Labels go to the More Options menu at the top right of the screen of a Saved Pick and Pack.

Delivery labels will prompt for a quantity but default to 1. In either case choose “Run Report” then print as required
Finishing the Pick & Pack
Once all items are scanned the user can Finish the Pick & Pack using this option at the top of the screen.
If there are no changes to the invoice, the “Place invoice on hold” checkbox defaults to off but can be turned on.
If there are changes to the invoice the user will be notified and the “Place invoice on hold” checkbox defaults to on but can be turned off.
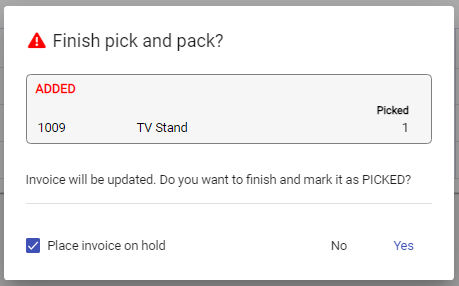
Finishing the Pick & Pack updates the status of the invoice to:
- Picked
- Awaiting Dispatch
- On Hold (If the user has selected to Place invoice on hold)
Deleting a Pick & Pack
A user can delete a Pick & Pack record using the Pick and Pack option at the top of the screen.

