To receipt a purchase order, go to Suppliers > Purchase Orders and locate the purchase order.

Use the spill menu beside the purchase order and select Receipt, or Receipt & Invoice as applicable.
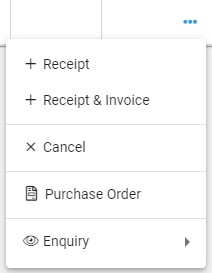
A new Purchase Order Receipt (or Purchase Order Receipt & Invoice) opens with the supplier information auto-filled.

Enter the Receipt and Invoice (if applicable) details. You can show or hide the invoice details by ticking the Enter Invoice checkbox. If you tick this, you'll see the same view as when you select Receipt & Invoice from the menu.

Complete the receipt fields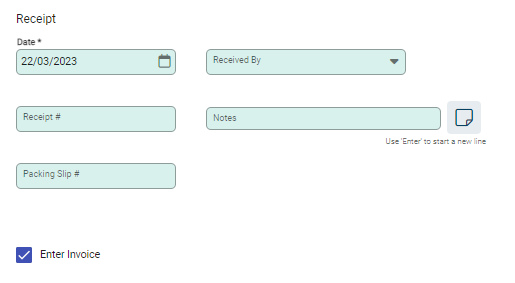
- Date: The date the goods have been received.
- Received By: The person who receives the goods. This may or may not be the same person issuing the product receipt.
- Receipt Number: Enter a product receipt number if required, or leave blank and Infusion will generate a receipt number.
- Notes: Enter as required.
- Packing Slip: Enter the packing slip number (required field).
Complete the invoice fields

- Dates: Enter the Invoice and Payment Due dates.
- Our Order Number: Enter the purchase order number.
- Supplier Invoice Number: Enter the supplier invoice number (required field).
- Invoice Total (Incl GST): Enter the invoice total (required field).
- Line Item Rates Are: GST exclusive. This field is pre-filled by details in the purchase order and cannot be changed. It is provided for information only.
- Freight & Rounding: Enter if required. Ensure freight and rounding are correct for the invoice.
- Variance: The difference between the invoice total and the received amount.
The variance figure will update as you receipt product lines lower down the page. The variance figure calculates receipt lines against the invoice total, and must be at zero to post the receipt. You can record variances in the Rounding field, either manually or by using the arrows to auto-fill the variance amount.
Add more purchase orders to the receipt
You can add more than one purchase order to the same receipt by selecting + Add Purchase Orders above the purchase order line. This is useful if the supplier has sent products from two purchase orders on one packing slip or invoice. Selecting this option will add the lines of the purchase order to the receipt, and previously received or part received lines will be shown.

A pop up window will appear showing the available purchase orders to select from. Tick the checkbox next to the purchase order you want to add, and then select Add Selected.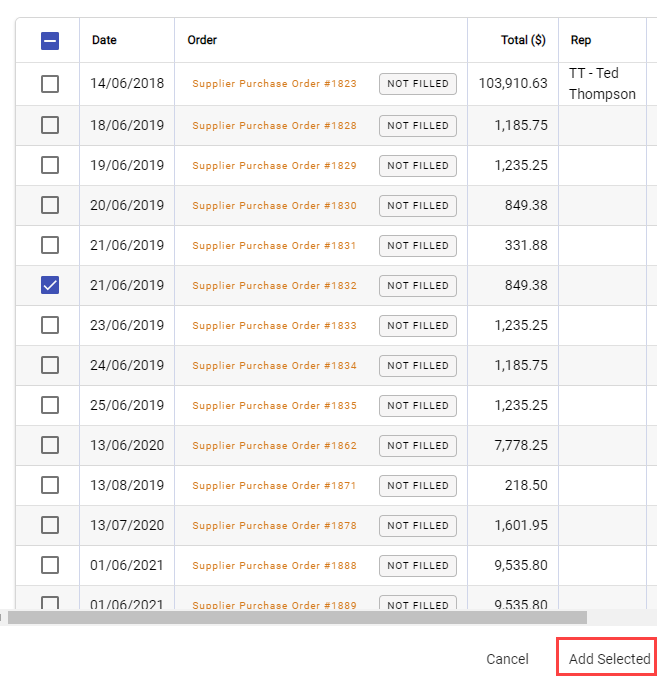
The lines of the purchase order will be added to the receipt.
Products will be receipted to the location in the purchase order header. For example, if a purchase order created for Auckland is receipted with a purchase order for Christchurch, the location in the header of the purchase order will override the location the purchase order was originally set to.
Record the items received
Select anywhere on the Product Line to enable editing of the product.

When the line opens, it will default to the Receiving field. When you hover over the field, a box will appear telling you the number of ordered, received, and outstanding units (items), as well as the ratio of units. You can use this as a quick reference to check that what you've received matches what you ordered.
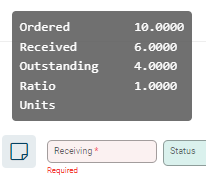
Enter the number of units received. As you do this, other fields will update. The purchase order line Status will change to Received if the received and ordered quantities match.

If you enter a number that exceeds the number of units ordered, a box will appear to let you know.

Updating the freight costs
The freight cost on the purchase order can be split across the items on the purchase order. Choose Update Shipping Costs to bring up the freight window.

The Freight to Split figure is the total freight on the Purchase Receipt, and can be split manually by entering a figure into each line of the Freight column.
The freight figure can also be split across multiple items automatically using the calculation basis.The different calculation basis options are:
- Quantity - Freight is split across the number of each item ordered. A larger quantity of items attracts more freight.
- Volume - The greater the volume ordered, the more freight is assigned to it
- Weight - Heaver items are assigned a greater level of the freight figure
- Cost - Items with a higher cost attract a greater portion of the freight figure
Choosing Reset will revert the freight figures back to the calculated split, based on the chosen calculation basis. It doesn't clear the freight figures or reset them back to zero.
Once the freight has been allocated to each item line, choose Update Shipping Costs to return to the Purchase Receipt.
Receive all items at once
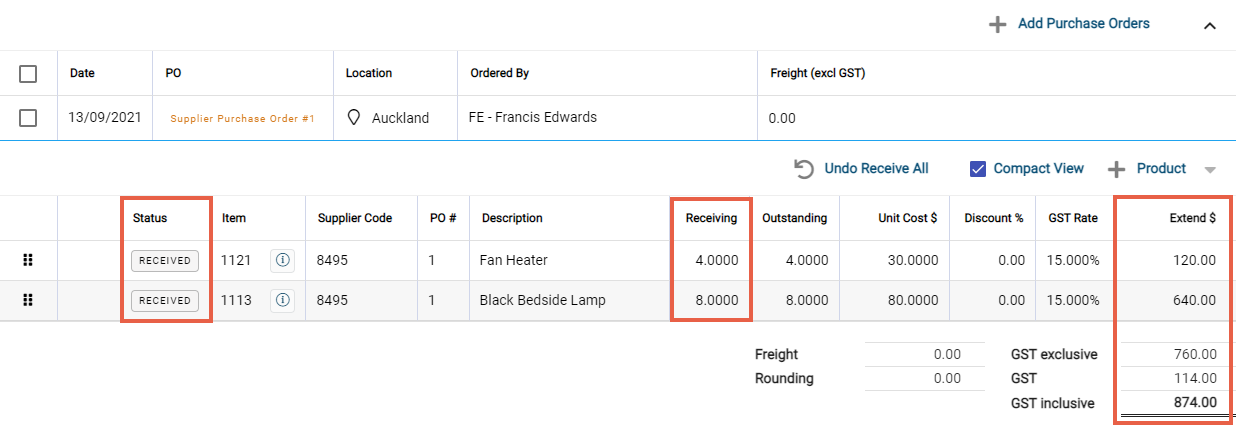
If all or most of the items have been received, you can select Receive All to receive all items at the same time. All outstanding quantities will appear in the Receiving column. You can then edit any lines that were only partially received.
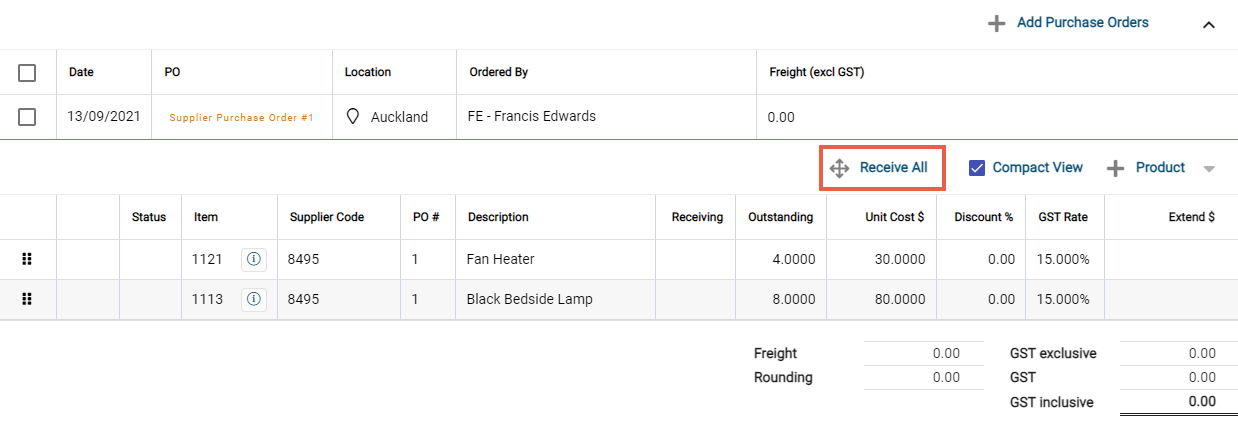
When you select Receive All, the Status (Received) and costs fields will all update automatically. You can undo this action by selecting Undo Receive All.
You are unable to edit a purchase order once it's been ordered, but you can at the receipting and invoicing stage. You'll notice that most fields become editable. Only edit details on the purchase order if they have not been entered, not been entered correctly, or something has changed before the items arrived.
Post the receipt and invoice
Select Post in the Toolbar at the top of the screen. Then select Confirm on the pop-up window to receipt and invoice the purchase order.

The Update Product Costs and Update Supplier Latest Costs fields provide options for managing how product costs are updated. These fields default to the configuration defined under Settings > Products > Product Settings.
If a receipt includes multiple lines for the same product with different rates, Infusion will use the lowest rate from the receipt lines as the latest cost.

